有些 Windows 10 体验(例如:启用触摸功能的 UI 页面)必须在新式应用容器内运行。
如果要添加这些体验,请用 UWP 组件扩展桌面应用程序。
在许多情况下,你可以直接从桌面应用程序中调用 UWP API,如果你已准备就绪,那我们开始吧。
1
显示新式 XAML UI
作为应用程序流的一部分,你可以将基于 XAML 的新式用户界面并入桌面应用程序。 这些用户界面可自然地适应不同屏幕尺寸和分辨率,并支持新式交互模型,如触摸和墨迹。
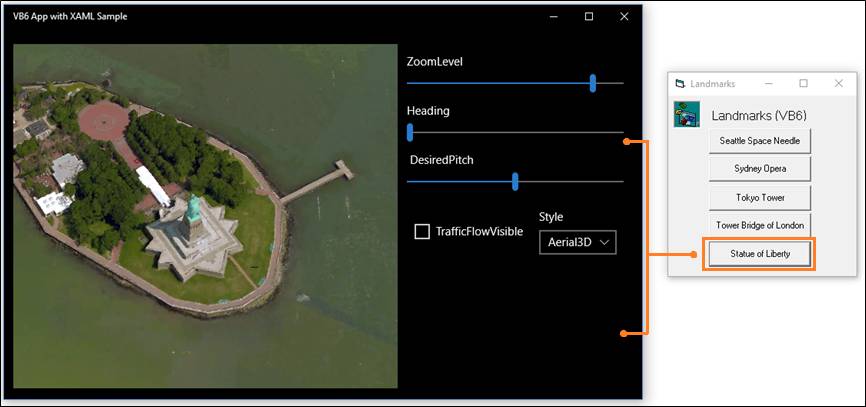
例如,借助少量 XAML 标记,即可为用户提供与地图相关的强大可视化功能。
此图像显示 VB6 应用程序,该应用程序可打开包含地图控件的、基于 XAML 的新式 UI。
设计模式
要显示基于 XAML 的 UI,请执行以下操作:
1. 添加 UWP 项目
向你的解决方案中添加一个空白应用(通用 Windows)项目。
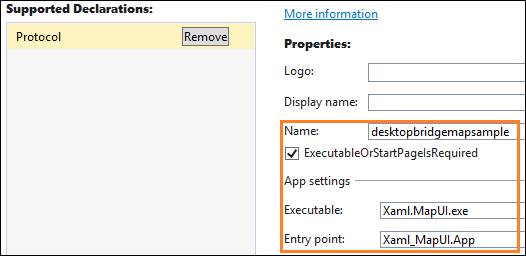
2. 添加协议扩展
在解决方案资源管理器中,打开项目的 package.appxmanifest 文件并添加扩展。
<Extensions>
<uap:Extension
Category="windows.protocol"
Executable="MapUI.exe"
EntryPoint=" MapUI.App">
<uap:Protocol Name="desktopbridgemapsample" />
</uap:Extension>
</Extensions>
为协议给定名称,提供 UWP 项目生成的可执行文件的名称以及入口点类的名称。
还可以在设计器中打开 package.appxmanifest,选择声明选项卡,然后在此处添加扩展名。
备注
地图控件可从 Internet 下载数据,因此如果你使用一个地图控件,则必须还要向清单中添加“Internet 客户端”功能。
3. 启动 UWP 应用
首先,创建一个 Uri(https://msdn.microsoft.com/library/system.uri.aspx),其中包含协议名称和要传入 UWP 应用的任何参数。 然后,调用 LaunchUriAsync 方法。
下面是 C# 基本示例。
private async void showMap(double lat, double lon)
{
string str = "desktopbridgemapsample://";
Uri uri = new Uri(str + "location?lat=" +
lat.ToString() + "&?lon=" + lon.ToString());
var success = await Windows.System.Launcher.LaunchUriAsync(uri);
if (success)
{
// URI launched
}
else
{
// URI launch failed
}
}
在我们的示例中,我们将以更加间接的方式执行一些操作。 我们已将该调用包装在一个名为 LaunchMap 的 VB6 可调用互操作函数中。 该函数是使用 C++ 编写的。
以下是 VB 块:
Private Declare Function LaunchMap Lib "UWPWrappers.dll" _
(ByVal lat As Double, ByVal lon As Double) As Boolean
Private Sub EiffelTower_Click()
LaunchMap 48.858222, 2.2945
End Sub
以下是 C++ 函数:
DllExport bool __stdcall LaunchMap(double lat, double lon)
{
try
{
String ^str = ref new String(L"desktopbridgemapsample://");
Uri ^uri = ref new Uri(
str + L"location?lat=" + lat.ToString() + L"&?lon=" + lon.ToString());
// now launch the UWP component
Launcher::LaunchUriAsync(uri);
}
catch (Exception^ ex) { return false; }
return true;
}
4. 分析参数并显示页面
在 UWP 项目的应用类中,覆盖 OnActivated 事件处理程序。 如果应用已通过协议激活,则分析参数并打开所需页面。
void App::OnActivated(Windows::ApplicationModel::Activation::IActivatedEventArgs^ e)
{
if (e->Kind == ActivationKind::Protocol)
{
ProtocolActivatedEventArgs^ protocolArgs = (ProtocolActivatedEventArgs^)e;
Uri ^uri = protocolArgs->Uri;
if (uri->SchemeName == "desktopbridgemapsample")
{
Frame ^rootFrame = ref new Frame();
Window::Current->Content = rootFrame;
rootFrame->Navigate(TypeName(MainPage::typeid), uri->Query);
Window::Current->Activate();
}
}
}
相似示例
Northwind 示例:UWA UI & Win32 传统代码的端到端示例(https://github.com/Microsoft/DesktopBridgeToUWP-Samples/tree/master/Samples/NorthwindSample)
Northwind 示例:连接到 SQL Server 的 UWP 应用(https://github.com/Microsoft/DesktopBridgeToUWP-Samples/tree/master/Samples/SQLServer)
2
向其他应用提供服务
添加其他应用可以使用的服务。 例如,你可以添加一个服务,以允许其他应用对你的应用之后的数据库进行受控访问。 通过实现后台任务,即使桌面应用未运行时,应用也可以访问该服务。
下面是执行此操作的示例。
设计模式
要显示提供服务,请执行以下操作:
1. 添加 Windows 运行时组件
向你的解决方案中添加 Windows 运行时组件(通用 Windows)项目。
然后,从你的 UWP 打包项目中引用该运行时组件的项目。
2. 添加应用服务扩展
在解决方案资源管理器中,打开打包项目的 package.appxmanifest 文件并添加应用服务扩展。
public sealed class AppServiceTask : IBackgroundTask
{
private BackgroundTaskDeferral backgroundTaskDeferral;
public void Run(IBackgroundTaskInstance taskInstance)
{
this.backgroundTaskDeferral = taskInstance.GetDeferral();
taskInstance.Canceled += OnTaskCanceled;
var details = taskInstance.TriggerDetails as AppServiceTriggerDetails;
details.AppServiceConnection.RequestReceived += OnRequestReceived;
}
private async void OnRequestReceived(AppServiceConnection sender,
AppServiceRequestReceivedEventArgs args)
{
var messageDeferral = args.GetDeferral();
ValueSet message = args.Request.Message;
string id = message["ID"] as string;
ValueSet returnData = DataBase.GetData(id);
await args.Request.SendResponseAsync(returnData);
messageDeferral.Complete();
}
private void OnTaskCanceled(IBackgroundTaskInstance sender,
BackgroundTaskCancellationReason reason)
{
if (this.backgroundTaskDeferral != null)
{
this.backgroundTaskDeferral.Complete();
}
}
}
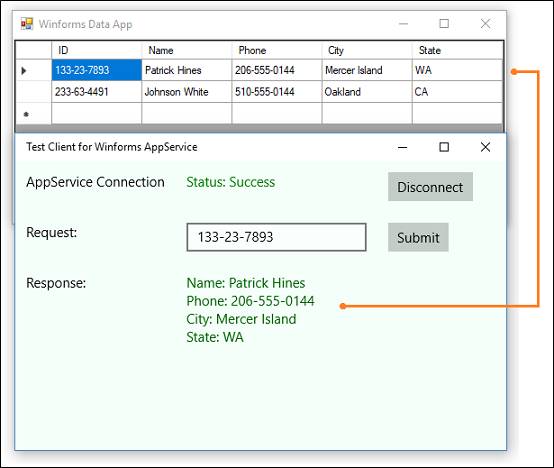
4. 测试应用服务
通过从其他应用中调用你的服务来对其进行测试。
private async void button_Click(object sender, RoutedEventArgs e)
{
AppServiceConnection dataService = new AppServiceConnection();
dataService.AppServiceName = "com.microsoft.samples.winforms";
dataService.PackageFamilyName = "Microsoft.SDKSamples.WinformWithAppService";
var status = await dataService.OpenAsync();
if (status == AppServiceConnectionStatus.Success)
{
string id = int.Parse(textBox.Text);
var message = new ValueSet();
message.Add("ID", id);
AppServiceResponse response = await dataService.SendMessageAsync(message);
string result = "";
if (response.Status == AppServiceResponseStatus.Success)
{
if (response.Message["Status"] as string == "OK")
{
DisplayResult(response.Message["Result"]);
}
}
}
}
相似示例
应用服务桥示例(https://github.com/Microsoft/DesktopBridgeToUWP-Samples/tree/master/Samples/AppServiceBridgeSample)
使用 C++ win32 应用的应用服务桥示例(https://github.com/Microsoft/DesktopBridgeToUWP-Samples/tree/master/Samples/AppServiceBridgeSample_C%2B%2B)
接收推送通知的 MFC 应用程序(https://github.com/Microsoft/DesktopBridgeToUWP-Samples/tree/master/Samples/MFCwithPush)
3
使桌面应用程序成为共享目标
可使你的桌面应用程序成为共享目标,以使用户能够轻松地共享数据,如来自支持共享的其他应用的图片。
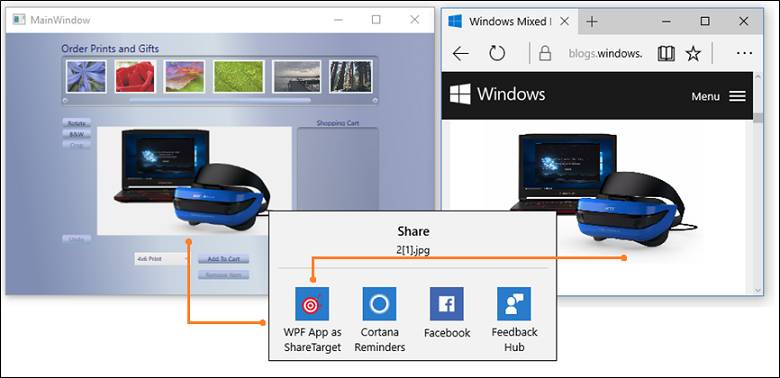
例如,用户可能选择你的应用来共享来自 Microsoft Edge 这一照片应用的图片。 下面是具有该功能的 WPF 示例应用。
设计模式
要使你的应用程序成为共享目标,请执行以下操作:
1. 向你的解决方案中添加一个 UWP 项目
向你的解决方案中添加一个空白应用(通用 Windows)项目。
2. 添加共享目标扩展
在解决方案资源管理器中,打开项目的 package.appxmanifest 文件并添加扩展。
<Extensions>
<uap:Extension
Category="windows.shareTarget"
Executable="ShareTarget.exe"
EntryPoint="ShareTarget.App">
<uap:ShareTarget>
<uap:SupportedFileTypes>
<uap:SupportsAnyFileType />
</uap:SupportedFileTypes>
<uap:DataFormat>Bitmap</uap:DataFormat>
</uap:ShareTarget>
</uap:Extension>
</Extensions>
提供 UWP 项目生成的可执行文件的名称以及入口点类的名称。 你还必须指定可用你的应用共享的文件类型。
3. 覆盖 OnNavigatedTo 事件处理程序
覆盖 UWP 项目的应用类中的 OnNavigatedTo 事件处理程序。
当用户选择你的应用来共享文件时,将调用此事件处理程序。
protected override async void OnNavigatedTo(NavigationEventArgs e)
{
this.shareOperation = (ShareOperation)e.Parameter;
if (this.shareOperation.Data.Contains(StandardDataFormats.StorageItems))
{
this.sharedStorageItems =
await this.shareOperation.Data.GetStorageItemsAsync();
foreach (StorageFile item in this.sharedStorageItems)
{
ProcessSharedFile(item);
}
}
}返回搜狐,查看更多
责任编辑:

